How to repair a Hella 5DV HID Xenon Ballast that has broken.
Clearly, very many people have had problems with their Xenon light ballasts breaking down, judging by the amount of questions on this topic around the world wide web. In almost all cases I have seen, people asking if they can be repaired get the answer – No! Get a new one.
Well, I have the Hella 5DV ballasts in my Jaguar X-Type. They both broke down. I took them apart and it turned out to be a simple fix to repair them.
Here’s how to!
In short, we will loosen the front bumper on one side so we can remove the headlight housing from the car, this is an easy 10 minute job. We will then remove the ballast which is fixed underneath the headlight, open it up, re-solder a component, and then put everything back again. All in all you’ll be done in less than an hour.
1. Remove the washer jet cover
Grab the washer jet cover and pull out. Remove the cover from the washer jet arm by carefully lifting the top flap to loosen the “cross” connecting the jet arm and the cover.
![20170916_162202[1]](https://magixians.files.wordpress.com/2017/09/20170916_1622021.jpg?w=416&resize=416%2C416&h=416#038;h=416&crop=1 "20170916_162202[1]")

2. Loosen the front bumper
There are a mere three bolts on each side that holds the front bumper in place. We will just remove the side with the non working light. Loosen the two above the headlight housing. Then remove the screws fixing the wheel housing shroud to the bumper, by that you will get access to the one bolt that holds the bumper on the side. Preferably use a ratchet spanner, 10mm, to loosen that one.
![20170916_162302[1]](https://magixians.files.wordpress.com/2017/09/20170916_1623021.jpg?w=509&resize=509%2C286&h=286#038;h=286 "20170916_162302[1]")
![20170916_161350[1]](https://magixians.files.wordpress.com/2017/09/20170916_1613501.jpg?w=509&resize=509%2C286&h=286#038;h=286 "20170916_161350[1]")
![20170916_161610[1]](https://magixians.files.wordpress.com/2017/09/20170916_1616101.jpg?w=323&resize=323%2C576&h=576#038;h=576 "20170916_161610[1]")
![20170916_161534[1]](https://magixians.files.wordpress.com/2017/09/20170916_1615341.jpg?w=96&resize=96%2C170&h=170#038;h=170 "20170916_161534[1]")
![20170916_161908[1]](https://magixians.files.wordpress.com/2017/09/20170916_1619081-e1505678232667.jpg?w=124&resize=124%2C170&h=170#038;h=170 "20170916_161908[1]")
![20170916_162401[1]](https://magixians.files.wordpress.com/2017/09/20170916_1624011.jpg?w=302&resize=302%2C170&h=170#038;h=170 "20170916_162401[1]")
![20170916_162407[1]](https://magixians.files.wordpress.com/2017/09/20170916_1624071.jpg?w=302&resize=302%2C170&h=170#038;h=170 "20170916_162407[1]")
Grab hold of the bumper by the wheel house and pull out, it will come loose. You might wanna disconnect the cable connector to the fog lights.
3. Remove the headlight housing
Now remove the two bolts under the headlight housing.
Then pull the housing out a bit, and disconnect the electrical connector. It’ll be a bit easier using a screw driver to push it off.
Now detach the water hose for the washer jet. There is a small plastic clip holding it in place. Remove the clip and pull the hose upp to get it off.
![20170916_162434[1]](https://magixians.files.wordpress.com/2017/09/20170916_1624341.jpg?w=509&resize=509%2C286&h=286#038;h=286 "20170916_162434[1]")
![20170916_162443[1]](https://magixians.files.wordpress.com/2017/09/20170916_1624431.jpg?w=509&resize=509%2C286&h=286#038;h=286 "20170916_162443[1]")
![20170916_163110[1]](https://magixians.files.wordpress.com/2017/09/20170916_1631101.jpg?w=323&resize=323%2C576&h=576#038;h=576 "20170916_163110[1]")
![20170916_163259[1]](https://magixians.files.wordpress.com/2017/09/20170916_1632591.jpg?w=416&resize=416%2C740&h=740#038;h=740 "20170916_163259[1]")
![20170916_163347[1]](https://magixians.files.wordpress.com/2017/09/20170916_1633471.jpg?w=416&resize=416%2C740&h=740#038;h=740 "20170916_163347[1]")
![20170916_163422[1]](https://magixians.files.wordpress.com/2017/09/20170916_1634221.jpg?w=836&resize=836%2C470&h=470#038;h=470 "20170916_163422[1]")
The headlight housing is now completely free, just take it out of the car.
4. Remove the ballast from the housing
Open the plastic cover on the back of the main headlight, and detach the electrical connector.
Turn the headlight upside down, and remove the three screws fixing the ballast to the housing. Remove the ballast.
![20170916_163515[1]](https://magixians.files.wordpress.com/2017/09/20170916_16351511-e1505679007577.jpg?w=417&resize=417%2C234&h=234#038;h=234 "20170916_163515[1]")
![20170916_163648[1]](https://magixians.files.wordpress.com/2017/09/20170916_1636481.jpg?w=415&resize=415%2C234&h=234#038;h=234 "20170916_163648[1]")
![20170916_163715[1]](https://magixians.files.wordpress.com/2017/09/20170916_1637151.jpg?w=836&resize=836%2C470&h=470#038;h=470 "20170916_163715[1]")
This is a good time to use a steel brush to clean the ballast a bit. The red sealing can be removed first so it doesn’t get damaged.
5. Opening the ballast
To open the ballast, use a size 9 Torx driver to unscrew the four screws. You might have to gently knock it down into the head of the screws. Do not use size 8, you will ruin the bit and might damage the screw as well. Use a flat screw driver to carefully lift the lid off the casing. Note that the electronics PCB inside is fixed to the lid, so you will get all the electronics right out. Be careful. Do not touch the electronics.
![20170916_163735[1]](https://magixians.files.wordpress.com/2017/09/20170916_16373511.jpg?w=416&resize=416%2C234&h=234#038;h=234 "20170916_163735[1]")
![20170916_164227[1]](https://magixians.files.wordpress.com/2017/09/20170916_1642271.jpg?w=416&resize=416%2C234&h=234#038;h=234 "20170916_164227[1]")
![20170916_165524[1]](https://magixians.files.wordpress.com/2017/09/20170916_1655241.jpg?w=836&resize=836%2C469&h=469#038;h=469 "20170916_165524[1]")
6. Identifying the fault
On the top left corner in the photo above, you see a “large” black plastic component with three legs, the middle leg has been cut. This component is the one usually failing. But don’t worry, we won’t remove it. It has just come loose and we need to re-fasten it.
Instead of the middle leg of the component, that has been cut off, the back side of the component has been soldered onto the PCB, and this solder comes loose.
![20170916_164301[1]](https://magixians.files.wordpress.com/2017/09/20170916_16430111-e1505679665692.jpg?w=840&h=370)
In this photo, above, you can see what looks like a thin “crack” beween the component and the PCB. Try carefully lifting the component up, and you will see it comes up easily. This is where you have a lack of connection, causing your light to fail.
![20170916_165310[1]](https://magixians.files.wordpress.com/2017/09/20170916_1653101.jpg?w=840&h=473)
We will solder it back. Preferably use a 100 watt soldering iron. First put some solder on the PCB and the soldering iron tip. Let it float out on the PCB, and then push the component towards the soldering iron tip and as soon as the solder takes to the back of the component, in a second or two, quickly pull the tip out and push the component towards the PCB and hold it there for a few seconds while the solder settles. Be careful so you don’t burn your finger, you might wanna use a pen or something to put pressure on the component.
![20170916_165437[1]](https://magixians.files.wordpress.com/2017/09/20170916_1654371.jpg?w=836&resize=836%2C470&h=470#038;h=470 "20170916_165437[1]")
7 Put it back together
Clean the mating surfaces of the ballast lid and casing, and the seal. Be careful not to scratch the surface or to damage the seal.
Put everything back together in reverse order, but before fully inserting the housing, check that the light works.
![20170916_170850[1]](https://magixians.files.wordpress.com/2017/09/20170916_1708501.jpg?w=840&h=473)
8. Enjoy!
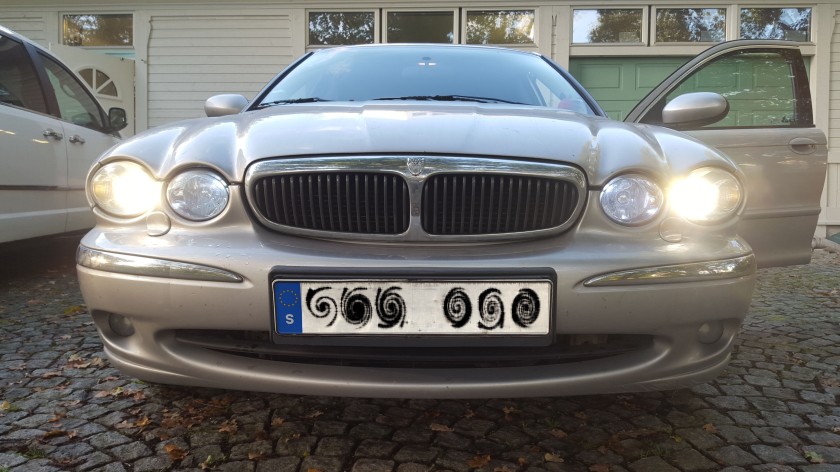
In this photo, I have just fixed both ballasts on this car.
I hope this was useful to you and that you like it! If you did, please hit the like-button and leave a comment 🙂

Hi there, its nice post on the topic of media print, we all be familiar with media is a enormous
source of data.
LikeLiked by 1 person
Excellent description with clear pictures. Made sorting my headlight out a lot easier. Thanks
LikeLiked by 1 person
Mate! You are the best! Just fixed mine.
Thank you so much!
LikeLike